Jekyll2024-05-31T04:31:29+00:00https://ilayk.com/feed.xmlit’s like awesome you know{"email"=>"hello@ilayk.com"}hello@ilayk.comperplexity.ai as the Default (Fallback) Search in Alfred2024-05-30T00:00:00+00:002024-05-30T00:00:00+00:00https://ilayk.com/2024/05/30/perplexity-ai-as-the-default-fallback-search-in-alfredI want to explore perplexity.ai as a replacement for Google search, but I always manage to not use it because Google is set up as the default everywhere on my system. On macOS, I’m using Safari, which unfortunately doesn’t provide a way to use Perplexity as the default search engine, and I don’t want to resort back to tools such as xSearch to get this functionality.
On macOS, I usually do everything with Alfred, and the default fallback search engine in Alfred is also set to Google. I’ve set up a custom search in Alfred for perplexity.ai a long time ago, but since Google is the default fallback when Alfred doesn’t resolve to a file or application, I end up on Google and barely remember to use my custom perplexity.ai shortcut.
It didn’t occur to me until now that it’s totally possible to change the default fallback search to the custom perplexity web search I’ve set up such a long time ago!
Add perplexity.ai as a Custom Web Search in Alfred
When you copy and paste the following block into your browsers URL bar, it should open Alfred and add the custom search.
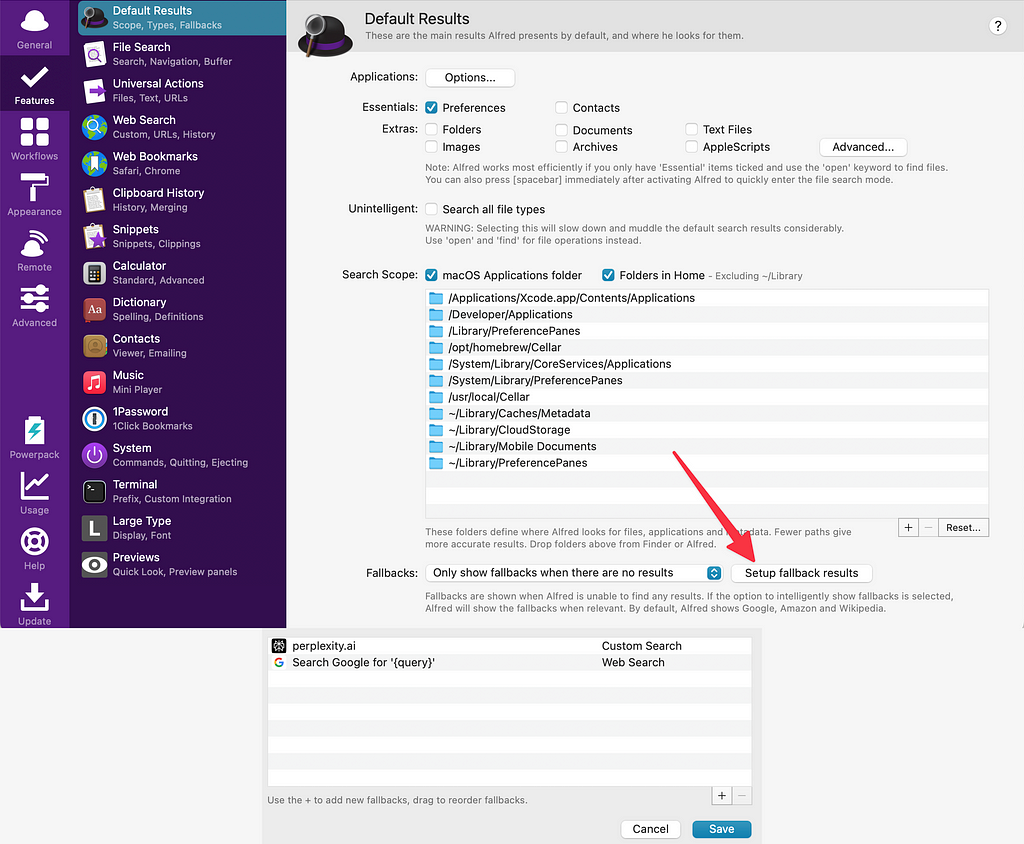
On the Alfred Defaults Results settings page, select Setup fallback results
Find your custom perplexity web search in the dropdown and move it to the top
Profit
]]>{"email"=>"hello@ilayk.com"}hello@ilayk.comFlash ESPHome on the Sonoff NSPanel2024-04-07T00:00:00+00:002024-04-07T00:00:00+00:00https://ilayk.com/2024/04/07/flash-esphome-on-the-sonoff-nspanelI got the Sonoff NSPanel (EU Version) to connect it to my home-assistant instance by flashing with it esphome. There are a few guides and video tutorials out there to get started. I’d recommend going to this GitHub project.
However, I had some issues flashing ESPHome onto this device since you can’t just connect it using a USB adapter. I’m trying to document how I was finally able to flash ESPhome onto the NSPanel. For everything else, please just use the existing guide(s).
jumper wires, well, to actually connect your computer and the panel
How to Wire Everything Together:
This is actually the whole reason for this blog post, everything I found out there didn’t work for me. So, this is what worked for me and my device.
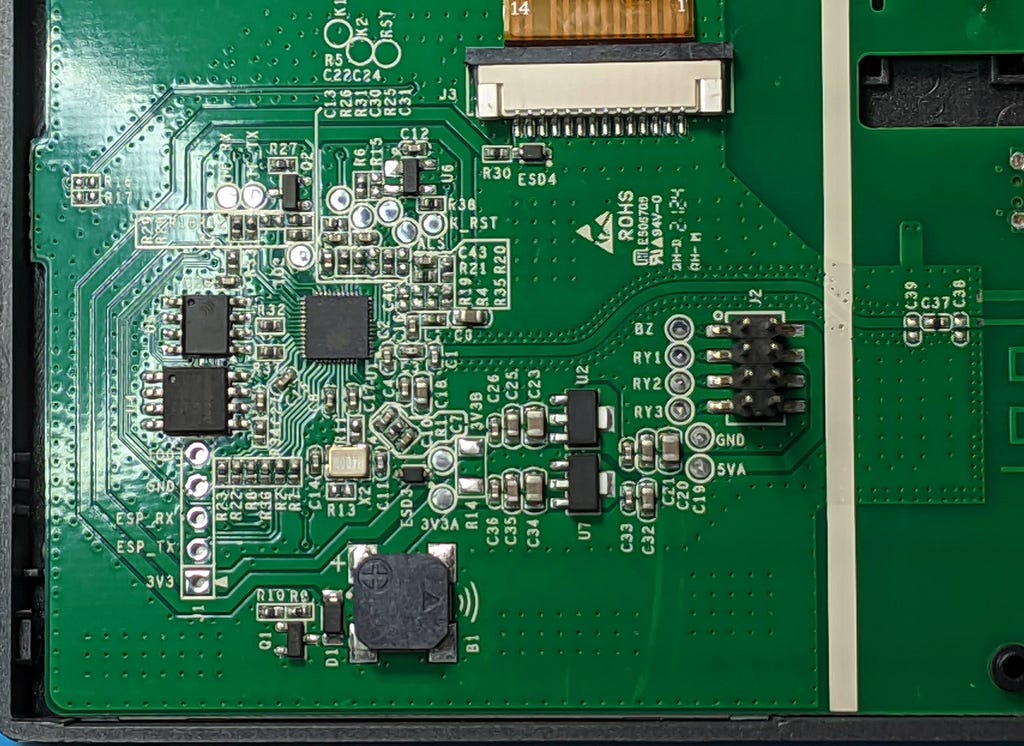
Here’s a pinout of the NSPanel to get a better understanding:
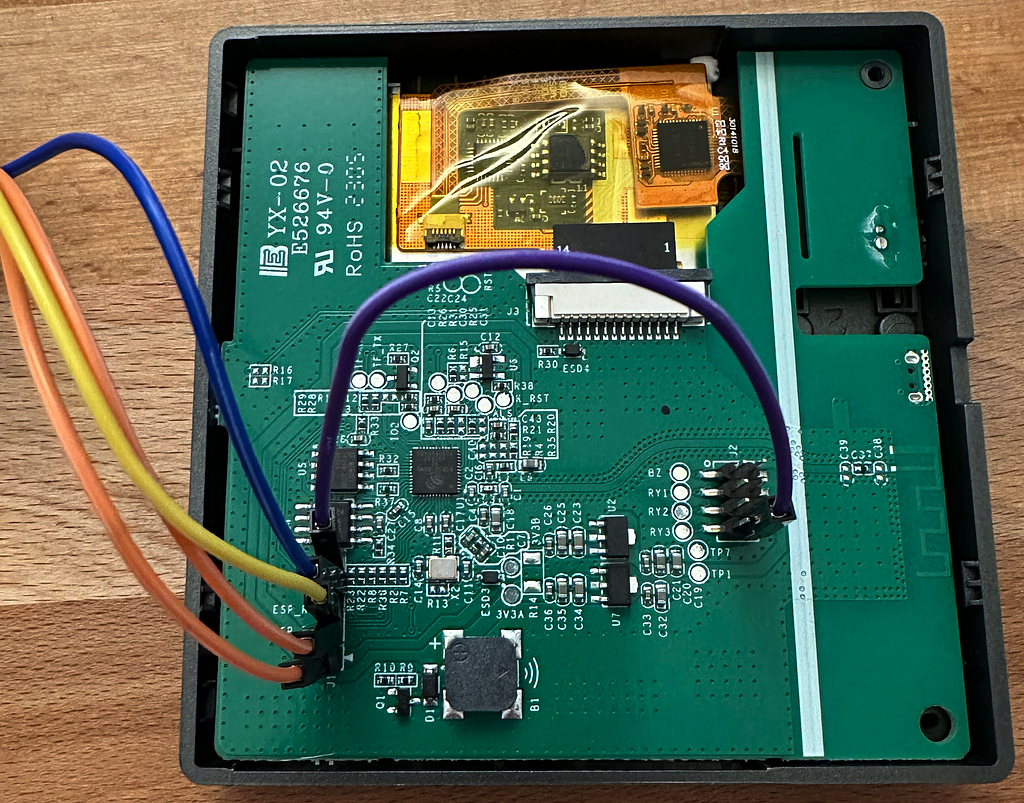
Connect The wires between the UART Adapter and the NSPanel like this
put the UART Adapter in 3V mode
USB adapter to NSPanel:
3v to 3v
gnd to gnd
RX to TX
TX to RX
Note that you need to cross RX and TX! This article helped me with that.
On the NSPanel itself, connect:
IO0 to gnd on the bottom gnd pin on the right side
Now you should be able to connect the usb adapter to your computer and use the web based esphome flasher.
]]>{"email"=>"hello@ilayk.com"}hello@ilayk.comAmazon SES and Mastodon in Docker2023-12-31T00:00:00+00:002023-12-31T00:00:00+00:00https://ilayk.com/2023/12/31/amazon-ses-and-mastodon-in-docker
I’ve been playing around with hosting my own Mastodon instance lately. If I continue this journey, I might write more about it. However, this post focuses solely on setting up email notifications between Amazon SES and Mastodon running within a Docker environment.
I had some trouble sending out emails successfully and it took a while to figure things out. With this post I just want to add to the confusion by providing my working configuration.
I have the following SMTP_ parameter in my .env file:
]]>{"email"=>"hello@ilayk.com"}hello@ilayk.comQuick Bookmarks / Clippings in Obsidian2023-05-01T00:00:00+00:002023-05-01T00:00:00+00:00https://ilayk.com/2023/05/01/quick-bookmarks-clippings-in-obsidianSave Quick Bookmarks / Clippings in Obsidian
I was looking for a quick and easy way to save links from the page I’m currently on and save them to a single file in Obsidian. Ideally with some tags, so I can find them later on. While I like the idea of saving the whole web page as well, export it as a PDF or PNG so it can be read when I’m offline or the page is gone. While this sounds good, I figured that an offline archive of a website or project probably doesn’t help me ultimately, since, well, it’s offline and I rather want to use things which are still updated and maintained. Just my two cents on this.
So, instead of a fully featured bookmarking sync service with tons of features and offline reading capabilities, I decided that I just need the url, website title and an option to add hashtags at the end of the text to find it later on.
Let’s save all of this in a single big file in Obsidian. Ultimately, it’s just a plain text markdown file. I can move it around, modify it with other utilities and go about my day.
Long story short, it just requires this bookmarklet:
You might want to use something like this bookmarklet maker to make it usable as a bookmark in your browser’s bookmark bar.
It’ll take the website title, give you an option to modify it, let you add some tags, and put it into your Obsidian vault pointing to a specific note. It’s just appending the contents to the file if it exists already.
You need to update lines two and three with your vault’s name and the name of the note you want to create/use for it.
The bookmarklet also works in Safari on iOS, no need for an additional shortcut.
Here’s a short Keyboard Maestro Macro which allows you to select file(s) in macOS Finder and rename them to lowercased filenames. There’s not much else to it otherwise. I configured it as a selection within the Keyboard Maestro Menu Bar icon, or to use it via the global trigger.
]]>{"email"=>"hello@ilayk.com"}hello@ilayk.comScrape Cloudflare Tunnel With Prometheus2023-01-27T00:00:00+00:002023-01-27T00:00:00+00:00https://ilayk.com/2023/01/27/scrape-cloudflare-tunnel-with-prometheusScrape Cloudflare Tunnel With Prometheus & Display Data in Grafana
It’s best to follow the instructions on GitHub to install it, as they also have the latest information there on how to do this.
PodMonitor for cloudflared
When Prometheus and Grafana are up, you can configure a PodMonitor to tell Prometheus to scrape all the information from the individual cloudflared pods. To do so, I make the following assumptions about the Kubernetes environment:
Namespace for Prometheus / Grafana: monitoring
release label: monitoring
The cloudflared deployment has the following labels: app=cloudflaredand release: monitoring
The snippet is a single YAML file which contains the cloudflared Deployment, the Secret to authenticate cloudflared, and the PodMonitor for Prometheus.
Query Data in Grafana
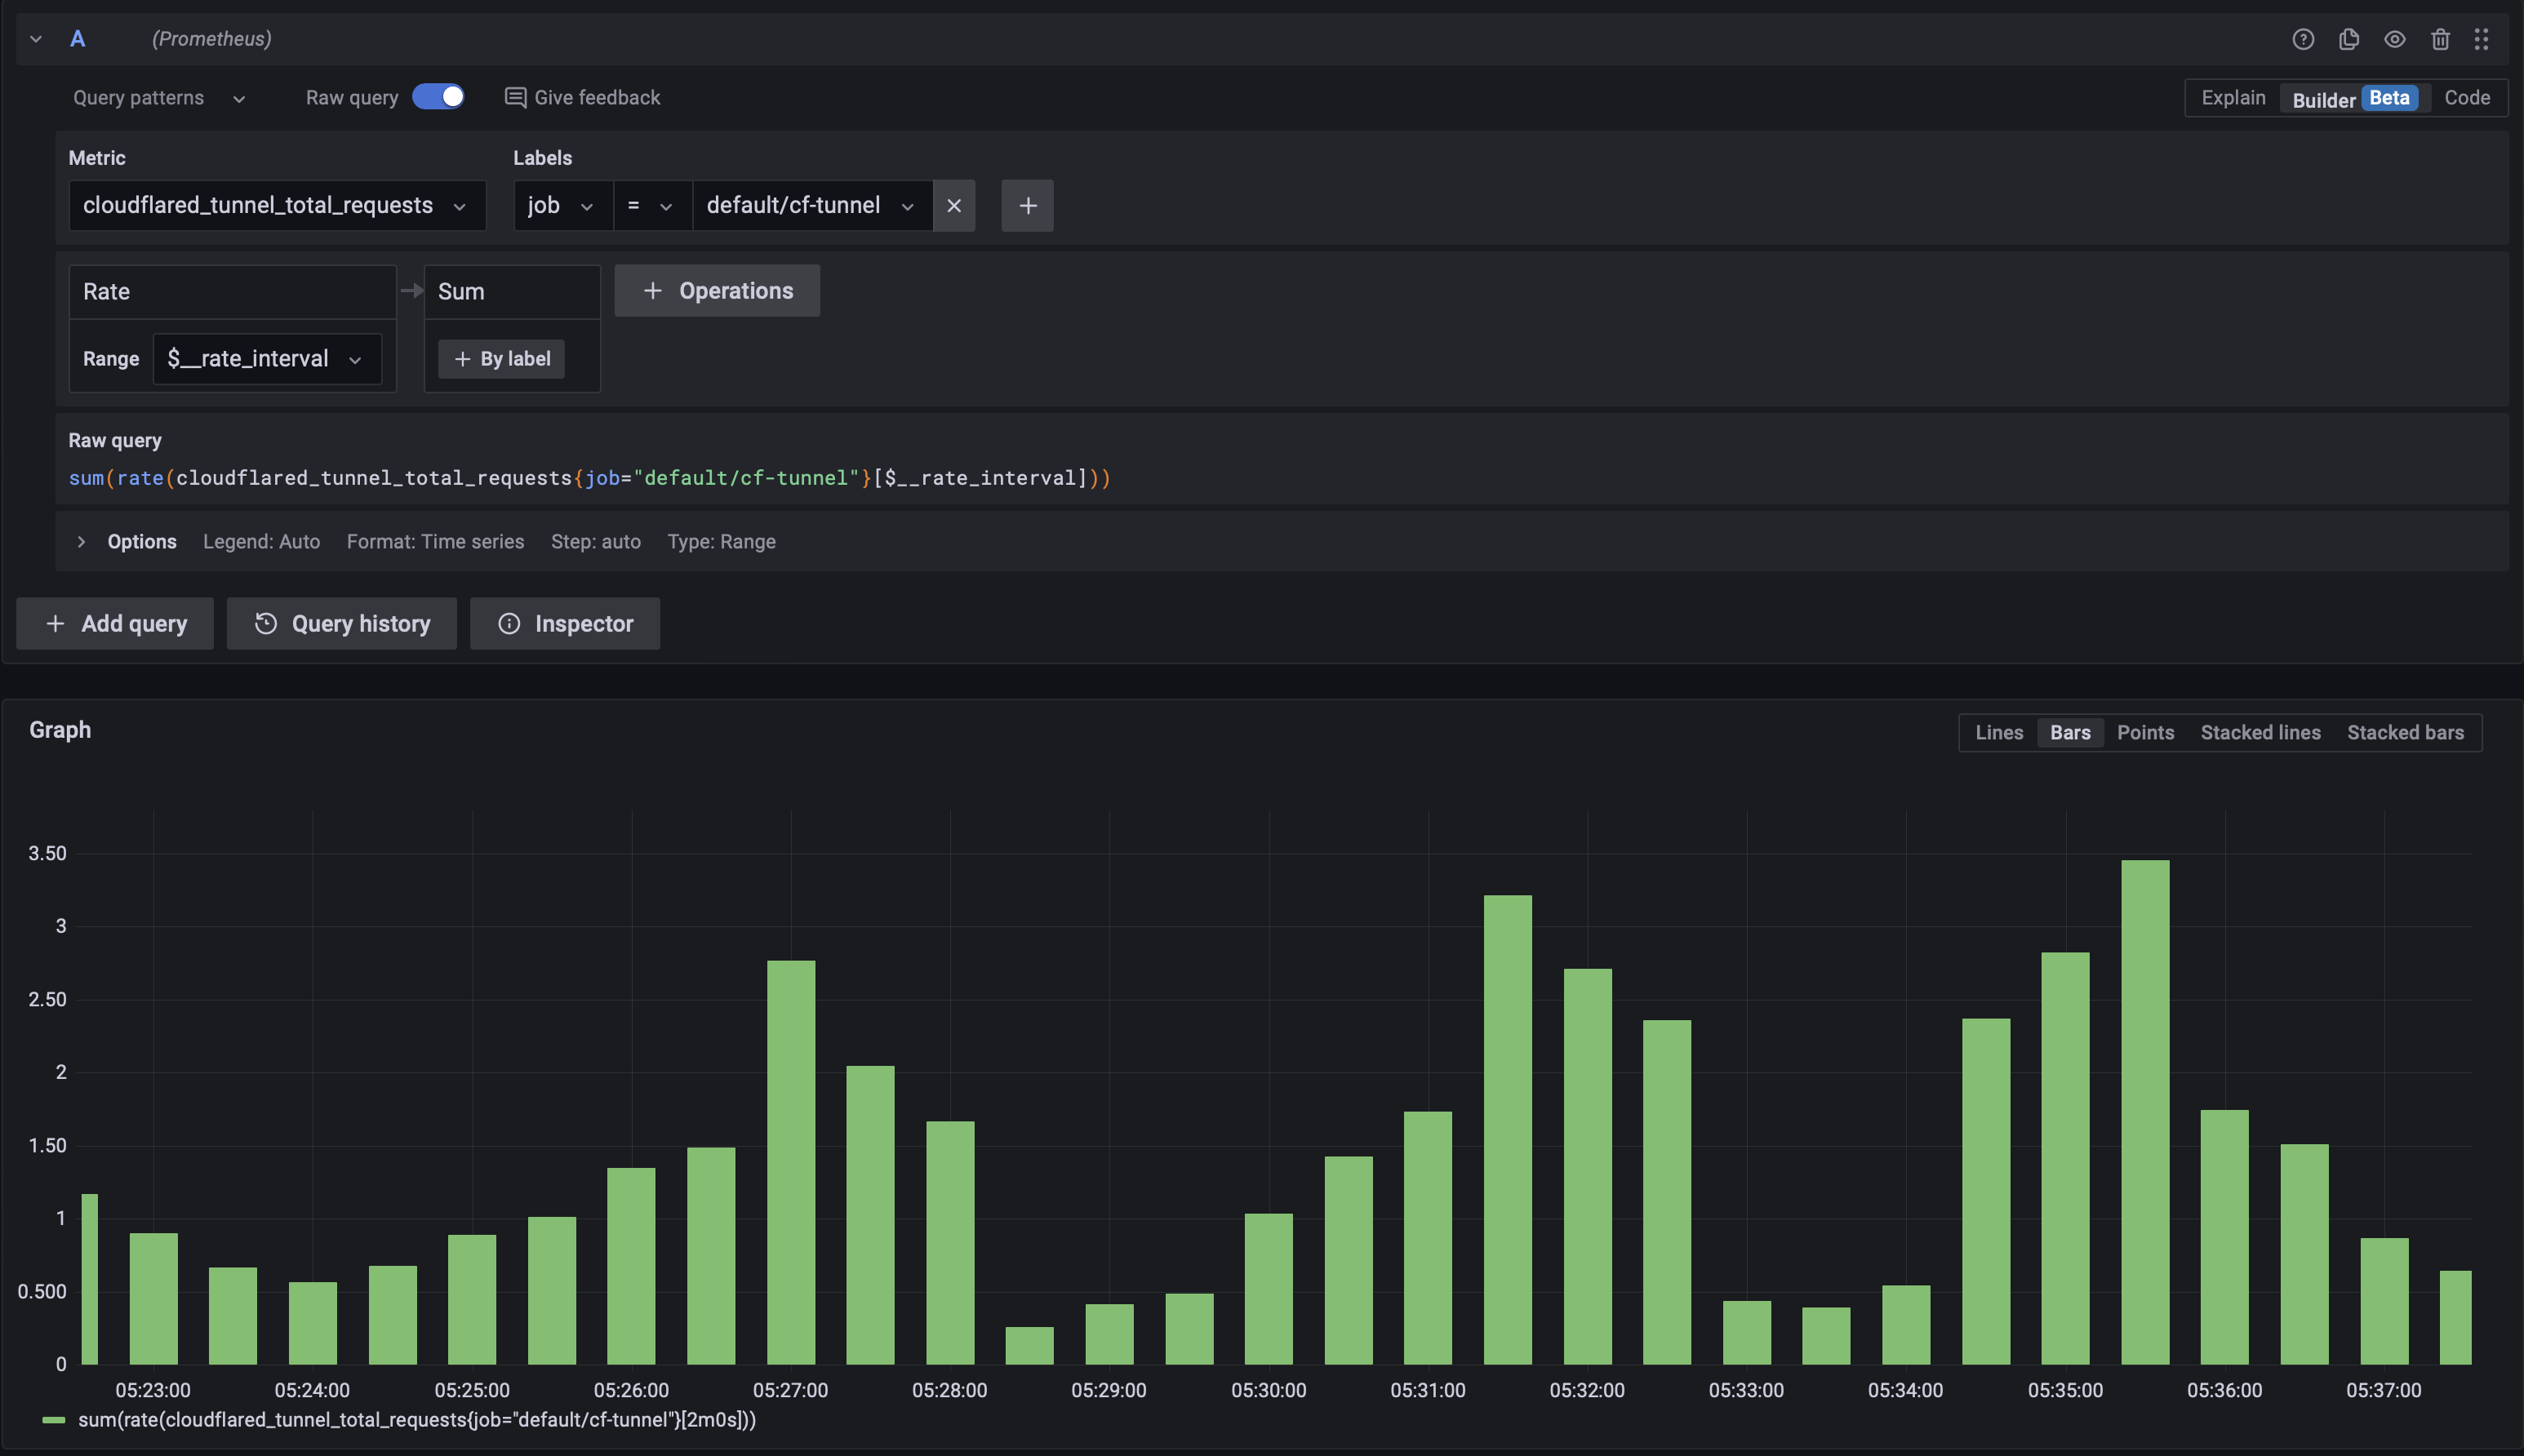
With the kube-prometheus-stack everything’s connected already, meaning data from Prometheus can be queried directly in Grafana. To do so, just get started in the Explore tab, select Prometheus as the data source and put in a query like so:
sum (rate(cloudflared_tunnel_total_requests {job="default/cf-tunnel"}[$__rate_interval]))
There are also autocomplete suggestions depending on your environment, names for the deployment, pods etc.
With the rate() function you can calculate the average rate of requests in a given timeframe. There are many more functions available to make useful Dashboards.
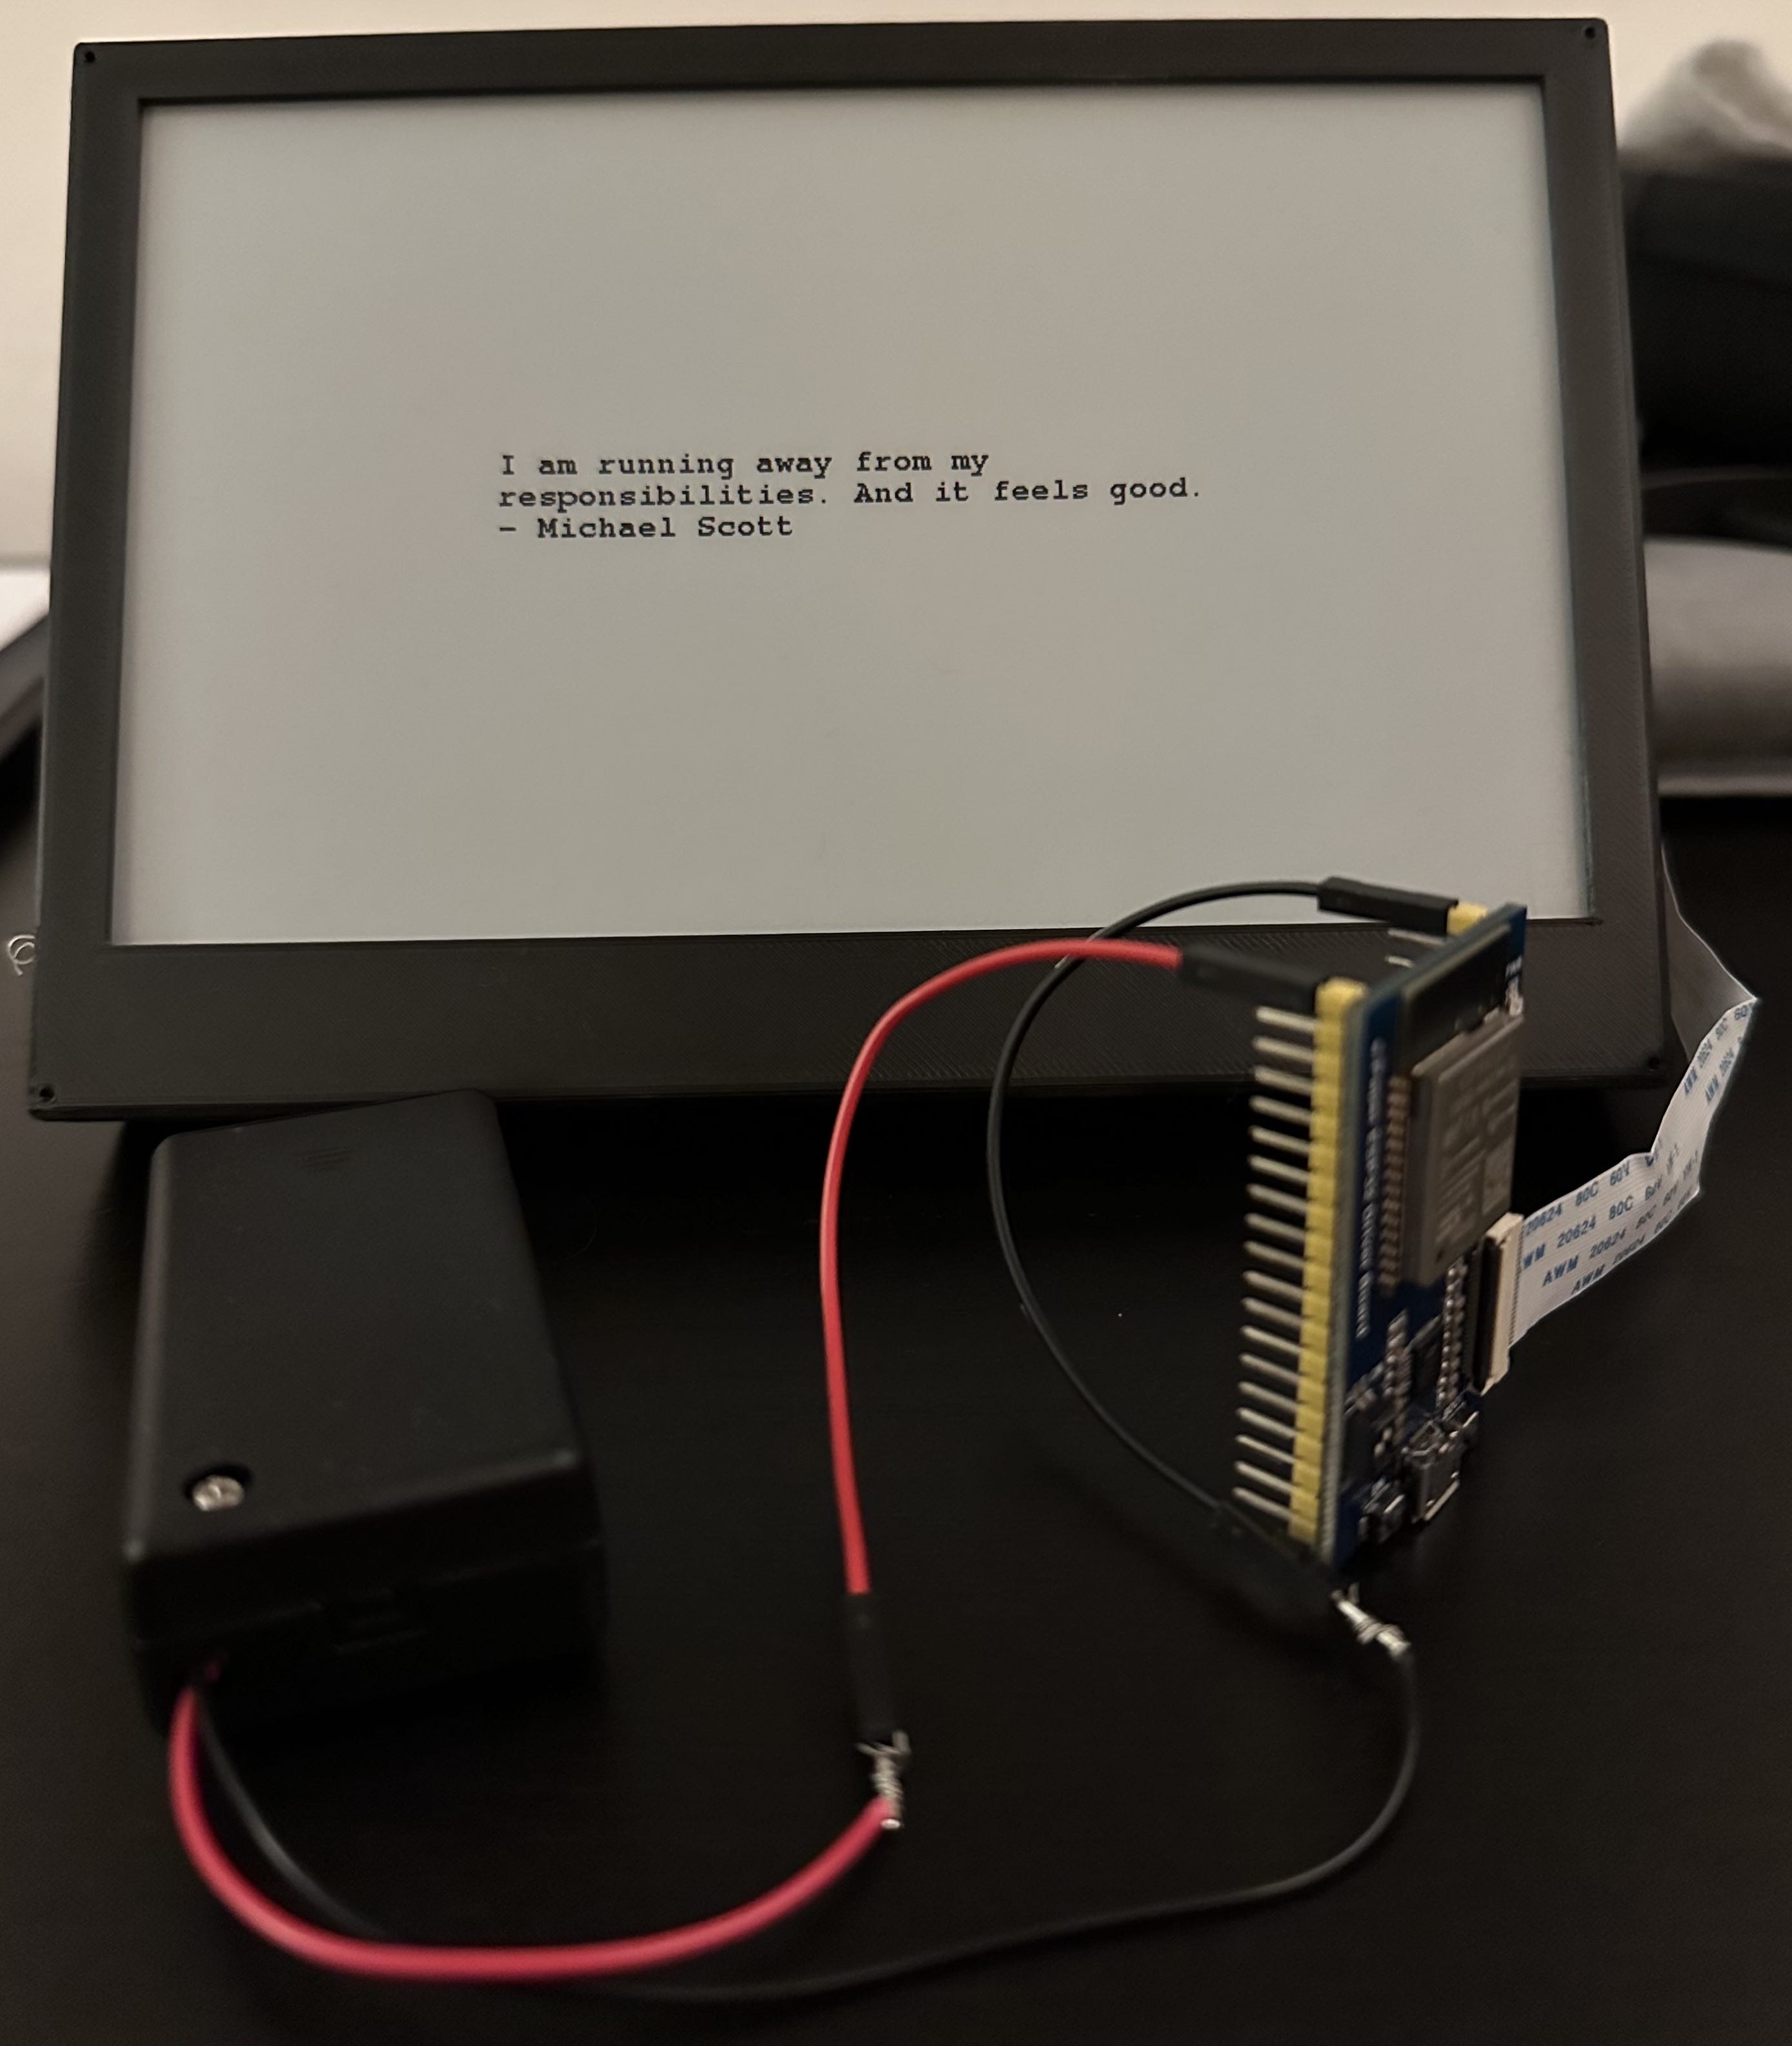
using the rate() function to calculate requests]]>{"email"=>"hello@ilayk.com"}hello@ilayk.comEncouraging The Office Quotes on an e-Paper Display2023-01-09T00:00:00+00:002023-01-09T00:00:00+00:00https://ilayk.com/2023/01/09/encouraging-the-office-quotes-on-an-e-paper-displayEncouraging The Office Quotes on an E Ink Display
I got an E Ink Display sometime last year and connected it to a Raspberry Pi Zero to use it as a low-power device to show the weather information for the day, perhaps some other stuff like calendar appointments. The list goes on.
I even got the PiSugar to connect the Pi Zero with a battery. I managed to keep the Pi Zero powered with the battery for about 30 days on a schedule to turn it on once a day, fetch the information and update the display. After recharging it once, interest faded at some point and the thing ended up in a closet.
The initial plan was to power the E Ink display with an ESP32 Driver board for months or even years at a time without ever recharging. Since the ESP32 controllers can go in a deep-sleep mode and use basically no power at all. All this Arduino and ESP32 stuff failed on me since I couldn’t get the right C code working, that’s why I went for the whole Raspberry Pi route to get something running.
At some point during the holidays I finally got the stuff back out wanting to try all this again. Started the Arduino IDE and tried to gather all the C code I need to update the E Ink display with some basic information from a remote API.
Shouldn’t be too hard, right? Connect to Wi-Fi, fetch some JSON, place it in the right spot, update the display, and go back to sleep for a day.
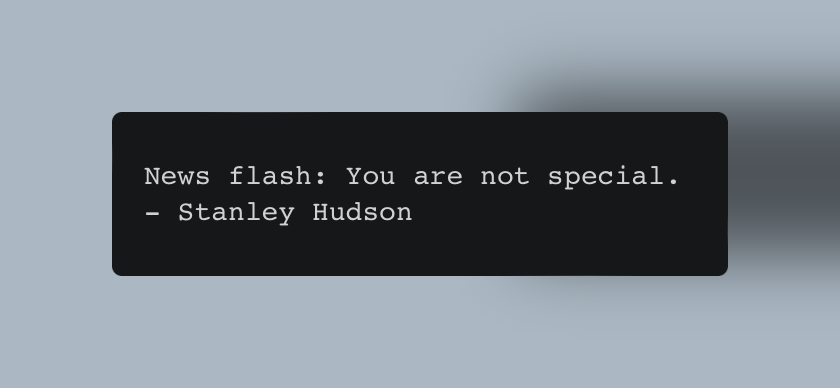
Since weather information is boring, always wrong anyway, and there are way better methods out there to get a report, I decided to display a random quote from The Office to help me get through the day.
Display and ESP32 Board
For beginners like myself, I just got the E-Ink display and ESP32 driver board with the correct interfaces out of the box, so there’s no need to solder anything or do some other fancy stuff. This board can directly connect to the display and has USB for power and data. Below is what I got and used for this project, but there are tons of different brands and versions out there:
I’m using the GxEPD2 Display Library which covers a lot of different e-Paper/E-Ink displays and has the model numbers listed (Good Display and Waveshare models seem to be the same). The code on my GitHub repo is set up to the use 800x480 7.5" display I linked above.
(update the display configuration if you’re using another one)
upload it to your ESP32 through the Arduino IDE
Case and Battery
This is the frame / case I got from thingiverse to store everything and put it on the wall. You can then get yourself a battery holder with some jumper wires or solder this stuff on, or use the USB plug. There’s a nice calculator available as well to figure out how long the system might be lasting.
Everything should fit into the case, so it’ll look like a picture frame on the wall.
In my case the display and board require about ~500 mW when it’s updating and ~80–100 mW in deep sleep. So if it’s updated once a day with a 2500 mAh battery connected, it should last about 1.5 years, which is fine, I guess.
More Things to Do
Since there’s still a lot of space left on the display, there are a few things one could add, perhaps the date, a reminder, whatever. For me this was mostly to finally learn at least a bit about how to do all this with the Arduino IDE, writing C and uploading this to a super low powered device.
]]>{"email"=>"hello@ilayk.com"}hello@ilayk.comCloudflare Tunnel as a Kubernetes Deployment — Ingress2022-09-23T00:00:00+00:002022-09-23T00:00:00+00:00https://ilayk.com/2022/09/23/cloudflare-tunnel-as-a-kubernetes-deployment-ingressCloudflare Tunnel as a Kubernetes Deployment / Ingress
Cloudflare Tunnel is a great tool to expose web applications to the internet, proxied through Cloudflare. You don’t need to open any incoming ports or allow-list IP-Addresses. It works on a Raspberry Pi at home with an Internet connection behind a NAT, meaning you don’t even need to have a public IP address to expose your services through. It also makes for a great ingress deployment for a k8s/k3s cluster to expose services. With Cloudflare Tunnel, I got rid of my nginx or traefik ingress controller and just expose everything through the cloudflared daemon.
There’s a guide here how to create a tunnel through the web interface, you’ll get a token back which is basically the only thing required to run Cloudflare Tunnel on a Kubernetes cluster. As soon as the tunnel is up and running, you can manage reverse proxy and DNS entries through the Cloudflare Web interface.
The only thing which might requires editing are the number of replicas you want to run (on line 9) and the version you want to use (line 37). By default, I’ve set the deployment to run 4 instances of the tunnel and it’ll always pull the latest version from the container registry.
Each tunnel process creates two outgoing tunnels into two different locations of Cloudflare, so you’ve got some high availability built-in right out of the box, but for seamless upgrading and handling more connections, it might be helpful to just run a few more replicas.
The only other thing which requires editing, is the Kubernetes secret. You have to edit line 53 and add the Cloudflare Tunnel token you’ve got when you created it through the Dashboard and put it base64 encoded in the YAML file. You can encode the token like so in a Terminal:
echo -n "your-token" | base64
Then put the string in the YAML file:
token: eW91ci10b2tlbg==
Now you can just deploy the YAML file to your Kubernetes cluster:
kubectl apply -f cloudflared.yaml
Create DNS Records for Your Deployments
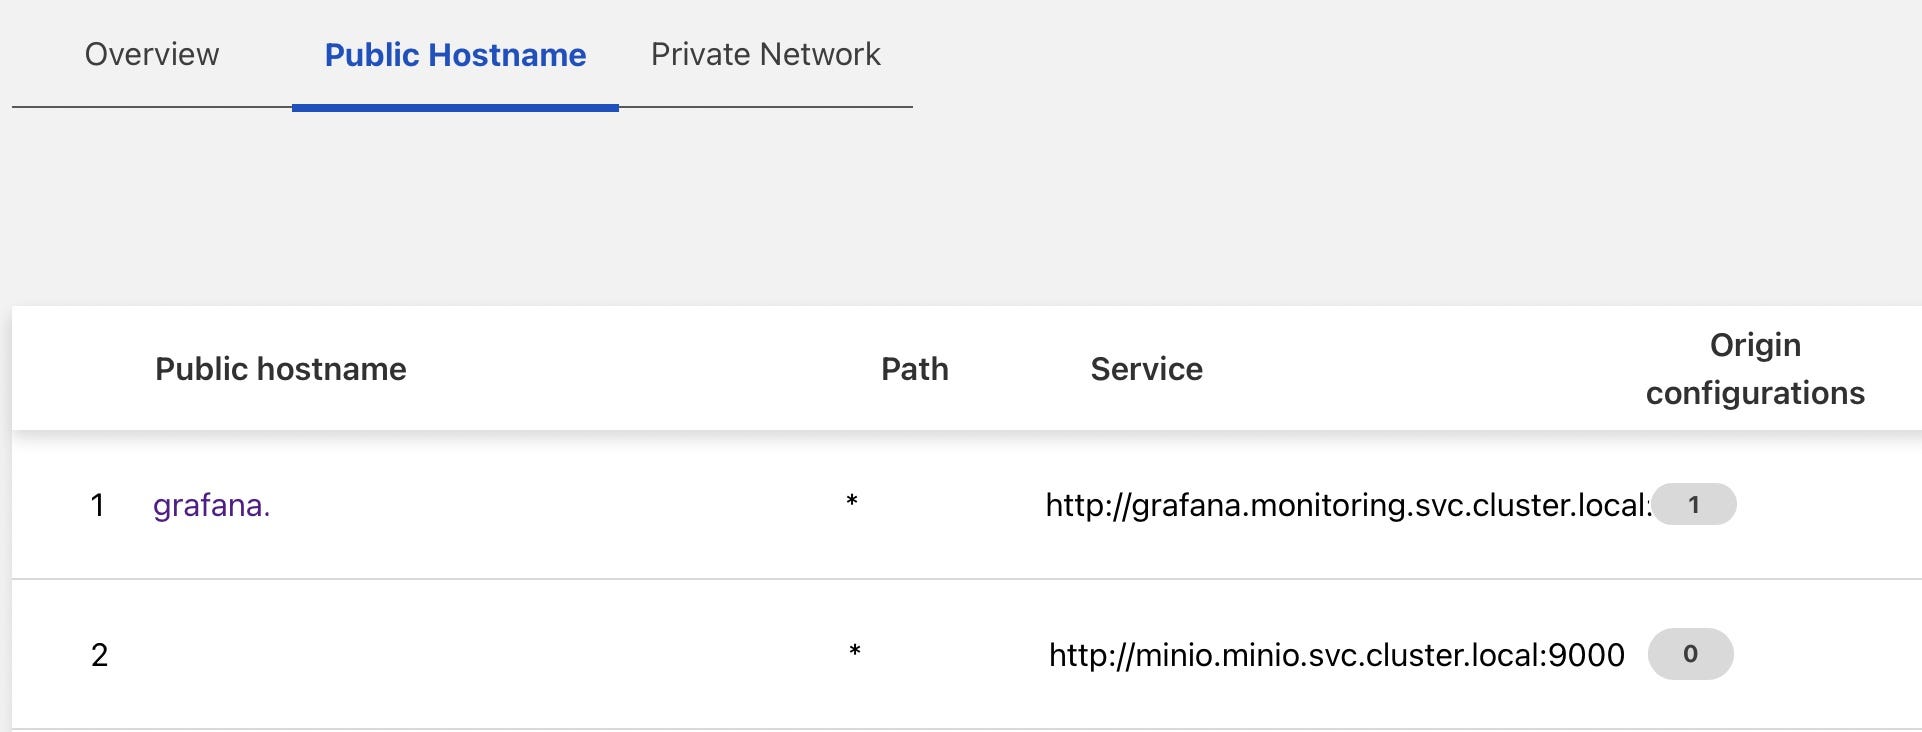
Now you want to make your Kubernetes services available to the internet, to make this happen, log-in to the Cloudflare Dashboard, navigate to Access => Tunnels and Add a public hostname.
Hostnames in k8s are built up like this:
<service-name>.<namespace>.svc.cluster.local
Assuming I have a deployment called grafana in the monitoring namespace listening on port 3000, you’d need to configure this in Cloudflare similar to this:
grafana.monitoring.svc.cluster.local:3000
If you have something in your default namespace, just use default instead of monitoring.
The DNS records will be created automatically, and the Cloudflare Tunnel process will automatically pick up these changes and routes traffic to your services. This way, you don’t need any other ingress controller on your cluster.
]]>{"email"=>"hello@ilayk.com"}hello@ilayk.comiTerm 2 & tmux & ssh2022-06-26T00:00:00+00:002022-06-26T00:00:00+00:00https://ilayk.com/2022/06/26/iterm-2-tmux-sshiTerm2 & tmux & ssh
iTerm2 offers nice tmux integration, I’m trying to get into the habit of automatically using tmux for all remote SSH sessions, in case my internet connection disconnects while I’m running commands on a remote machine. If I get disconnected, I can easily go back to the task I was doing when I’m back online.
This is another friendly reminder to my future self to always do this. I had this happen way too often: executing a long-running command on a remote machine, being disconnected from the SSH session and to have to start over. I use the following command to either jump into an existing tmux session, or create a new one if there’s none:
ssh jonas@server -t 'tmux -CC a || tmux -CC'
]]>{"email"=>"hello@ilayk.com"}hello@ilayk.comTailwind CSS Set a Minimum Font Size2022-05-19T00:00:00+00:002022-05-19T00:00:00+00:00https://ilayk.com/2022/05/19/tailwind-css-set-a-minimum-font-sizeTailwind CSS: Set a Minimum Font Size
I always like to use the latest and greatest things out there for my side projects, or rather the new things I’m learning about. These days, it’s Tailwind CSS to make websites look nice. Specifically also libraries on top of Tailwind CSS which provide components to make things even easier to work with, such as daisyUI or HyperUI.
When you follow the instructions how to get everything in place and install things, either provided by one of the component libraries, or Tailwind CSS itself, you find yourself in a good position to start. Now, if you’re not too deep into all of these frameworks and 3rd party solutions and just want to tinker around like I do, I had a bit of trouble to find the right place how to override default settings or set them globally. For instance, I wanted to set a minimum font size for everything, while still having the option to update individual parts of the site. Let’s do this now.
Change Default Text / Font Size
First things first: I’m not sure if that’s really the right place to do modifications, however, it seemed the right place at the time, and it did exactly what I wanted: change the minimum font-size for my whole project.
When you install Tailwind CSS the way they have it documented on the page, you’ll end up with a index.css file somewhere in your folder structure (for me, it's src/index.css) and it typically looks like this:
Now, in order to make modifications for the whole site, you can add a couple of lines to this index.css file and update the html property/class(?) and just put regular CSS things in there. Here's the updated version of index.css to set the font-size to 14pt: